Sunday, February 25, 2018

APEX Authentication with Microsoft account

In the upcoming Oracle Application Express (APEX) 5.2 release, support has been added for so-called "Social Sign-In" authentication. This means that your users can login to an APEX application using an external authentication provider. In APEX 5.2, there is built-in support for Google and Facebook accounts. There is also support for "Generic OAuth Providers" and "OpenID Connect Providers". This blog post describes how you can use the "OpenID Connect Provider" to set up authentication with a Microsoft account, such as an Outlook.com account.


Here is how to do it:

A. Register the APEX application with Microsoft


1. Go to Microsoft Application Registration Portal. Note that you need a Microsoft account, such as an Outlook.com email account, to login and use this portal:

https://apps.dev.microsoft.com/

2. Add an app (enter a descriptive name, your users will see this name during the consent prompt in step 20 below). An Application ID gets generated. Click "Generate New Password" to generate a password.

3. Click "Add platform" and choose "Web". Enter the APEX callback URL as the "Redirect URL", for the APEX 5.2 Early Adopter this is:

https://apexea.oracle.com/pls/apex/apex_authentication.callback

4. Add the URL of the APEX app as the "Home Page URL":

https://apexea.oracle.com/pls/apex/f?p=your_app_alias:10


5. Click "Save"


B. Setup APEX Credentials


6. In APEX, go to Shared Components and click on "Credentials"

7. Create a new Credential and give it a name (for example "Azure OpenID Credentials"). Select "OAuth2 Client Credentials Flow" as the credential type.

8. Add the Application ID from step 2 above as the "Client ID", and the password from step 2 above as the "Client Secret".

9. Save the credentials.

C. Setup APEX Authentication Scheme


10. Go to Shared Components and click on "Authentication Schemes"

11. Create a new authentication scheme and give it a name (for example "Azure AD OpenID"). Select "Social Sign-In" as the scheme type.

12. As credential store, select the credentials created in step 9 ("Azure OpenID Credentials").

13. As authentication provider, select "OpenID Connect Provider".

14. As discovery URL, use the following:

https://login.microsoftonline.com/common/v2.0/.well-known/openid-configuration

15. As scope, type "email" (without the quotes)

16. As username attribute, type "email" (without the quotes)

17. Save the authentication scheme.

D. Test the Login


18. Go to the home page of your application:

https://apexea.oracle.com/pls/apex/f?p=your_app_alias:10

19. You should be redirected to a Microsoft login page. Log in with a Microsoft account (such as yourname@outlook.com).

20. You should be prompted to allow the APEX application to log you in and retrieve your email address to identify you. Accept this.

21. You should see the home page of your APEX application, and the value of APP_USER should now be equal to the email address you logged in with at Microsoft.

Switching between authentication schemes in the same APEX session


APEX version 5.2 also includes a new attributte for authentication schemes called "Switch in Session" that can be either Enabled or Disabled. If enabled, the current session's authentication scheme can be changed by passing APEX_AUTHENTICATION=scheme name in a URL's request parameter.


You can use this to present users with multiple login options. For example, you can have the standard APEX Authentication (or your own table-based authentication) set as the current authentication scheme, and then add another button to the login page which switches the authentication scheme to the Microsoft scheme (or Facebook, or Google, etc).


The screenshot above shows an example of a standard APEX login page where I have added an extra button (called "LOGIN_MICROSOFT"), set the icon CSS class to "fa-windows" to get the Windows logo on the button, and set the action attribute of the button to redirect to page 10 (the home page of the application) and also setting the request of the link to "APEX_AUTHENTICATION=name_of_microsoft_auth_scheme". Clicking this button should redirect to a Microsoft page for login, and then redirect the user back to the requested page.

Wednesday, February 21, 2018

Using the Slack webhook API from PL/SQL

Slack is a web-based chat room popular with many companies. Slack also has an API that can be used to post messages to a given "channel" or chat room. The simplest API offered is the "webhook" integration, which is "a simple way to post messages from external sources into Slack. They make use of normal HTTP requests with a JSON payload that includes the message text and some options."


To create a new Slack webhook, login to Slack and go to "Apps" in the left sidebar menu. Click "Manage apps..." and click "Custom Integrations" and then "Incoming Webhooks". Click on "Add Configuration" to create a new webhook. Specify the channel the webhook will post in, and click "Add incoming webhooks integration".


Next, take a note of the Webhook URL:


Then go to the Alexandria PL/SQL Utility Library and install the SLACK_UTIL_PKG package in your database schema. Modify your database Network ACL settings to include "hooks.slack.com" (port 443) to allow connections to the Slack site from the database.

Then use the package like this (see also demo script):


In addition to application-specific messages you could perhaps also set up the database (via a background job) to notify you when you are about to run out of disk space, when the number of APEX page views reach a certain threshold, when a specific user logs in, and so on. Use your imagination! :-)


Saturday, February 10, 2018

Pivot Table plugin for APEX (Updated)

Some years ago I created an APEX region plugin for displaying the results of a query as a Pivot Table. You can read the original blog post about that here.

The plugin proved quite popular, but people were having problems using it with APEX 5 due to a jQuery versioning conflict.

I've now updated the plugin so it works with APEX, both 5.0 and 5.1.


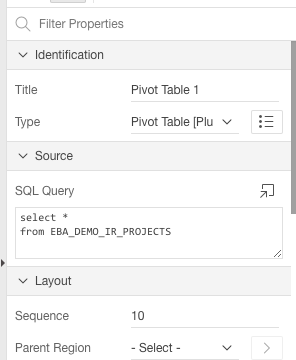
To use it, simply add a region to the page, change the region type to "Pivot Table" and write an SQL query as the region source:


On the region attributes page, specify the options. I've added some help text to explain the various options. Note that you can have more than one Pivot Table region on the same page, but be sure to use a unique name in the "DOM Element Name" attribute for each pivot table.


I've also added/enabled some extra features such as spreadsheet export (via TSV - tab separated values) and charting.


It should be noted that the plugin is just an APEX wrapper for the Javascript Pivot Table component by Nicolas Kruchten who did all the hard work. I merely packaged it up for use with APEX.

You can download the plugin from my APEX plugins page. Enjoy! :-)


Wednesday, October 18, 2017

Oracle XE 12c becomes Oracle XE 18c

Oracle Database, Express Edition (XE) is a free version of the Oracle Database, currently available as version 11g (11.2) for Windows and Linux.
A planned new version of Oracle XE based on 12c (12.2) was first mentioned back in 2013. Now we are in 2017 and Oracle has changed its version numbering, aiming for yearly releases of the database, which means that after 12c comes 18c (in 2018) and 19c (in 2019) and so on.

According to information coming out at this year's Oracle OpenWorld, the next version of Oracle Database Express Edition (XE) will therefore be Oracle XE 18c.

Below are the details known so far about this upcoming version. Disclaimer: I've collected this information from tweets and blogs, so nothing is official yet. Time will tell as to what is true. UPDATE: Gerald Venzl from Oracle has confirmed the below to be "all true" :-)

  • The next version of Oracle Express Edition (XE) will be 18c. (Source: Chris Saxon, Twitter)
  • Oracle XE 18c is expected in Q1 of 2018. (Source: AMIS blog). UPDATE: Oracle XE 18c "is currently planned between March and August 2018 and might change". (Source: Gerald Venzl, Twitter)
  • There will be yearly releases of Oracle Express Edition (XE), ie Oracle XE 19c in 2019, etc. (Source: Franck Pachot, Twitter).
  • There will be simultaneous releases of XE for Linux and Windows. (Source: Gerald Venzl, Twitter)
  • Limits for XE 18c will be 2 GB of memory, 12GB of storage (with basic/advanced compression bringing real capacity up to around 40GB), 2 CPUs and 4 pluggable databases. (Source: AMIS blog and Lucas Jellema, Twitter)
  • Express Edition (XE) will actually include "nearly all" of the features from Enterprise Edition (EE)! (Source: Franck Pachot, Twitter and Chris Saxon, Twitter).
  • Express Edition (XE) will still be free for both development and production. (Source: Chris Saxon, Twitter).
  • There will be no support (except through community/forums) for XE, and no bug fixes/patches. Still, with a yearly release cycle that means bugs will be fixed by upgrading to the latest release. (Source: Franck Pachot and Bob Bryla, Twitter)


If most, or even some, of the above is true, this is really great news! I understand we should thank Gerald Venzl at Oracle for this, as he is the guy working on bringing us all this goodness! Thanks in advance, Gerald! :-)


Monday, October 9, 2017

ODC Appreciation Day: The PL/SQL Language

Like last year, Tim Hall of oracle-base.com fame suggested we should all do an "ODC Appreciation Day" in honor of the Oracle Developer Community (ODC), by blogging about our favorite Oracle product or feature.

My personal favorite, after the database itself, is the PL/SQL language that runs inside the database.


Here's what's great about it:
  • Simple (and therefore easy to understand and quick to learn)
  • Runs everywhere the Oracle database runs (any operating system)
  • Seamlessly integrated with SQL
  • Great performance, not least because it runs in the database server alongside your data, thus eliminating a lot of mid-tier overhead 

I made a presentation a while back that goes into greater detail about what makes PL/SQL great, take a look at PL/SQL: The Good Parts.


Thanks ODC!


Tuesday, March 21, 2017

Using VS Code for PL/SQL development

I've been using Sublime Text as my main editor for PL/SQL development for many years, but I'm now in the process of switching to Visual Studio Code (VS Code).


Some good reasons to use VS Code:
  • Multi-platform (Windows, OS X, Linux)
  • Free, open source
  • Lightweight, fast (enough)
  • Large ecosystem of extensions
  • Built-in Git support
  • Can be adapted to PL/SQL coding via a plsql language extension (syntax highlighting, go to/peek definition, go to symbol) and PL/SQL compilation using sqlplus via a Task Runner (see below for PL/SQL specifics)

Installing VS Code and extensions

Download VS Code from https://code.visualstudio.com/ and run the installer.

Start VS Code and click the Extensions icon.
  • Search for "plsql" and install the "xyz.plsql-language" extension
 The following are all optional but recommended:
  • Search for "git history" and install the "donjayamanne.githistory" extension
  • Search for "better merge" and install the "pprice.better-merge" extension (update 24.09.2017: this extension is now part of VS Code itself and does not need to be installed separately)
  • Search for "git lens" and install the "eamodio.gitlens" extension
  • Search for "tag" and install the "formulahendry.auto-close-tag" extension
  • Search for "blackboard" and install the "gerane.Theme-Blackboard" extension
  • Search for "material icon" and install the "PKief.material-icon-theme" extension
  • Search for "plsql" and install the "apng.orclapex-autocomplete" extension (added 02.01.2018)
Click on "Reload" to restart VS Code with the new extensions loaded.

Your list of extensions should now look something like this:


Click File, Preferences, Color Theme and select the "Blackboard" theme.
Click File, Preferences, File Icon Theme and select the "Material Icon" theme.

Configuring a Task Runner to compile PL/SQL code

Click File, Open Folder and open a folder containing your PL/SQL code.
Click View, Command Palette and enter "task" then select "Configure Task Runner", select "Others".

Copy the following text and paste it into the tasks.json file:


Adjust the connection string as appropriate to your environment.

Copy the following text and save it as _show_errors.sql in the project root folder:


Linux and Mac: Copy the following text and save it as _run_sqlplus.sh in the project root folder (remember to chmod +x the file to make it executable).


Windows: Copy the following text and save it as _run_sqlplus.bat in the project root folder.


Optionally create a login.sql file in project root folder and add:


Editing code

The PL/SQL language extension by xyz provides syntax highlighting for PL/SQL, as well as a couple of very useful code navigation features.

You can go to a "symbol" (ie a function or procedure) inside a package by pressing Shift+Ctrl+O and typing the name of the symbol:


You can go to the definition of a function or procedure by pressing F12 when the cursor is on the function or procedure name (or right-click on the function or procedure name and select either "Go to definition", or "Peek definition" to see the definition in a popup window without leaving the current file).


Snippets

You can define your own snippets for frequently used code; see this how-to article. I recommend that you create snippets for frequently used code blocks such as if/then/else statements, case statements, and larger code blocks such as the skeleton for a package, procedure or function.

Building code

To build (compile) the current file into the database, press Shift+Ctrl+B (or click View, Command Palette, and type "build" to search for the relevant command).

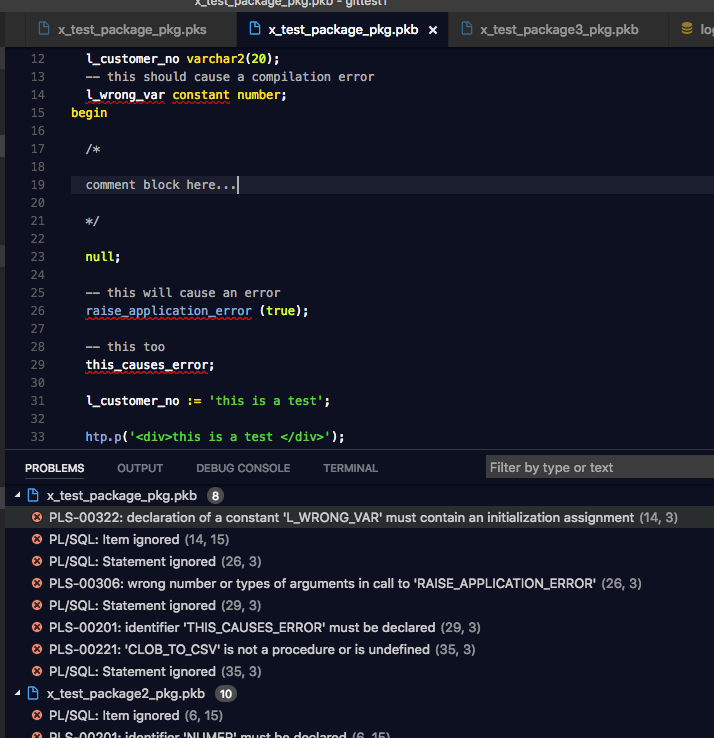
The build task runs sqlplus and passes it the filename of the current file. This creates or replaces the object in the database (you can see the commands being executed in the "Output" pane in VS Code). The build task then queries user_errors to get any errors and warnings from the database, and these are shown in the "Problems" pane in VS Code.


You can click on each problem to jump to the relevant line of code. You'll also see squiggly lines under the errors in the code itself, and you can hover over the text to see a tooltip containing the error message.

Note that since the build task queries the user_errors view without any filters, you get to see all errors in the schema, not just the errors for the current file. I actually like this, because it instantly shows me if there are any other problems in the schema that I might not otherwise be aware of.

Also, the build task assumes that you have one file per database object (ie separate files for package specifications and package bodies), and that the filenames match the database object names. This makes sense to me and I assume that's how most people organize their files, but you can tweak the _show_errors.sql script to generate output appropriate to your setup.


Version control with Git

VS Code has great built-in support for Git. I recommend installing a couple of git-related extensions (see above), but other than that, I'll just refer you to the official tutorial for using Git in VS Code.


That's it, enjoy using VS Code for PL/SQL development! :-)


Saturday, January 21, 2017

APEX Plugin: Calendar Heatmap Region

I was looking at the GitHub "contribution chart", which shows number of commits per day as a heatmap calendar. I thought this type of chart would be cool to have as an APEX plugin, so I went ahead and implemented it.


Here is a video I recorded to walk through how the plugin was made:


Note: For an alternative implementation, see the "Block Calendar" in Oracle JET. As far as I can tell, there is no built-in support for this chart in APEX, so you would have to write your own wrapper to use it as a plugin.


You can download the plugin and PL/SQL code from my GitHub repository.

Enjoy! :-)