Here is how to do it:
A. Register the APEX application with Microsoft
1. Go to Microsoft Application Registration Portal. Note that you need a Microsoft account, such as an Outlook.com email account, to login and use this portal:
https://apps.dev.microsoft.com/
2. Add an app (enter a descriptive name, your users will see this name during the consent prompt in step 20 below). An Application ID gets generated. Click "Generate New Password" to generate a password.
3. Click "Add platform" and choose "Web". Enter the APEX callback URL as the "Redirect URL", for the APEX 5.2 Early Adopter this is:
https://apexea.oracle.com/pls/apex/apex_authentication.callback
4. Add the URL of the APEX app as the "Home Page URL":
https://apexea.oracle.com/pls/apex/f?p=your_app_alias:10
5. Click "Save"
B. Setup APEX Credentials
6. In APEX, go to Shared Components and click on "Credentials"
7. Create a new Credential and give it a name (for example "Azure OpenID Credentials"). Select "OAuth2 Client Credentials Flow" as the credential type.
8. Add the Application ID from step 2 above as the "Client ID", and the password from step 2 above as the "Client Secret".
9. Save the credentials.
C. Setup APEX Authentication Scheme
10. Go to Shared Components and click on "Authentication Schemes"
11. Create a new authentication scheme and give it a name (for example "Azure AD OpenID"). Select "Social Sign-In" as the scheme type.
12. As credential store, select the credentials created in step 9 ("Azure OpenID Credentials").
13. As authentication provider, select "OpenID Connect Provider".
14. As discovery URL, use the following:
https://login.microsoftonline.com/common/v2.0/.well-known/openid-configuration
15. As scope, type "email" (without the quotes)
16. As username attribute, type "email" (without the quotes)
17. Save the authentication scheme.
D. Test the Login
18. Go to the home page of your application:
https://apexea.oracle.com/pls/apex/f?p=your_app_alias:10
19. You should be redirected to a Microsoft login page. Log in with a Microsoft account (such as yourname@outlook.com).
20. You should be prompted to allow the APEX application to log you in and retrieve your email address to identify you. Accept this.
21. You should see the home page of your APEX application, and the value of APP_USER should now be equal to the email address you logged in with at Microsoft.
Switching between authentication schemes in the same APEX session
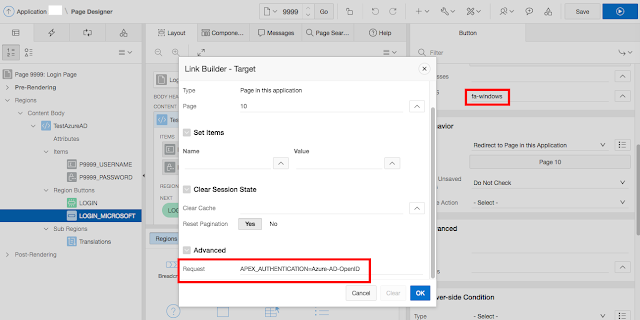
APEX version 5.2 also includes a new attributte for authentication schemes called "Switch in Session" that can be either Enabled or Disabled. If enabled, the current session's authentication scheme can be changed by passing APEX_AUTHENTICATION=scheme name in a URL's request parameter.
You can use this to present users with multiple login options. For example, you can have the standard APEX Authentication (or your own table-based authentication) set as the current authentication scheme, and then add another button to the login page which switches the authentication scheme to the Microsoft scheme (or Facebook, or Google, etc).
The screenshot above shows an example of a standard APEX login page where I have added an extra button (called "LOGIN_MICROSOFT"), set the icon CSS class to "fa-windows" to get the Windows logo on the button, and set the action attribute of the button to redirect to page 10 (the home page of the application) and also setting the request of the link to "APEX_AUTHENTICATION=name_of_microsoft_auth_scheme". Clicking this button should redirect to a Microsoft page for login, and then redirect the user back to the requested page.


